- What is this place?
- What do you mean by "no-frills"?
- How to Submit a Job
- What Materials Do I Supply ?
- What Materials Are Supplied by Small Batch ?
- How To Supply Parts
- What about PC Board Panelization ?
- Paste Mask File Format
- Placement BOM Format
- I have an entry in the BOM I don’t want populated
- Submitting a Job For a Quote
- Quote Received. Now What ?
- OK, I paid. Now What ?
- How do I make a change to a submitted job ?
- Yield, Rework, and Refunds
- Our Official Terms and Conditions
- Privacy Policies
- Where did the name “Small Batch Assembly” Come From ?
- Our Facilities
- About the Web Site
What is this place?
Small Batch Assembly is a low-volume, no-frills, electronics assembly service. We focus on the needs of Makers, Educators, DIY, Researchers, and EE professionals; Anyone needing a low-volume of surface-mount technology circuit boards assembled.
What do you mean by “no-frills”?
No-frills means customer jobs must meet the following constraints:
Maximum Board / Panel size:
216 x 290mm (8.5 x 11.5 in)
Surface-Mount Assembly Only
We can do through-hole in limited quantity. Email us to find out more.
Surface Mount Minimum Sizes
0201, 0402, 0603, WLCSP, QFNs, BGAs are OK w/minimum .4mm pitch
Can You Do Double-Sided?
Usually. Both sides cannot contain large or heavy parts; The surface tension of the solder must be enough to hold the part when they go through the reflow oven up-side down as the 2nd side is being reflowed. Most SMT parts < ~4mm (~.15inch) are usually OK. Contact us on email how to submit double-sided jobs or if you are uncertain.
How to Submit a Job
TL;DR Submit your job info. If you get stuck, email us.
You should first use our on-line price quotation tool by clicking on Get Instant Quote on the home page. The next step is to register or log in as a guest on our site. You can start by uploading your CAD files. We need a two things:
Placement Bill of Materials File (Placement BOM)
The Placement BOM is a file which specifies what parts are needed and where they go on the board. If you use the CADSoft Eagle PCB CAD package, we have a .ulp script in which you can download here which will automatically generate this file for you. If you use KiCAD, check out this Guide. In other EDA tools it is sometimes called a Centroid or XYRS file. Read further in the FAQ for more info on the Placement BOM file. As always you can email us if you get stuck.
Paste Mask Gerber
We also need your Paste Mask Gerber file. We also have a CADSoft Eagle .cam file in the same download as the ulp script file mentioned above to generate exactly what we need.
Submit Your Info
You submit your job for review. We will respond to you with a quote. A real human looks at your job and verifies that we can do it for you. We then send you a quote along with a payment link.
If you’d like to go ahead, just make the payment. It reserves your spot in the production schedule and is fully refundable until we begin production. We will then email instructions on how to prepare your production kit.
What Materials Do I Supply ?
You supply your printed circuit boards
You supply us with your un-populated printed circuit boards and components. We do not manufacture boards. We highly recommend Oshpark for low/medium volume boards in the USA. If you have a stencil, let us know when you submit your job. Otherwise, we will order a stencil from Oshstencils which will be returned to you for re-use after production.
You supply the parts
You send us the parts you want assembled on the board. We prefer you kit them and attach our bar codes. You can also ship them directly from the distributor. Be sure they understand our requirements for supplying parts on one continuous piece of cut tape (see below).
What Materials Are Supplied by Small Batch ?
Steel Stencils
We usually supply the stencil used to apply the paste to the board. We do this so that we can review and modify the apertures to optimize yield. If you already have a stencil we may be able to use it pending inspection. Please let us know before submitting your job and we will waive the stencil fee. The supplied stencil must be frameless.
We always like to review your stencil prior to fabrication especially if you have fine pitch parts with pins spaced < .75mm. We do that by looking at your paste layer gerber.
If your job is panelized we will need the panelized gerber paste layer file. The stencil will be returned to you and can be re-used for future runs.
How To Supply Parts
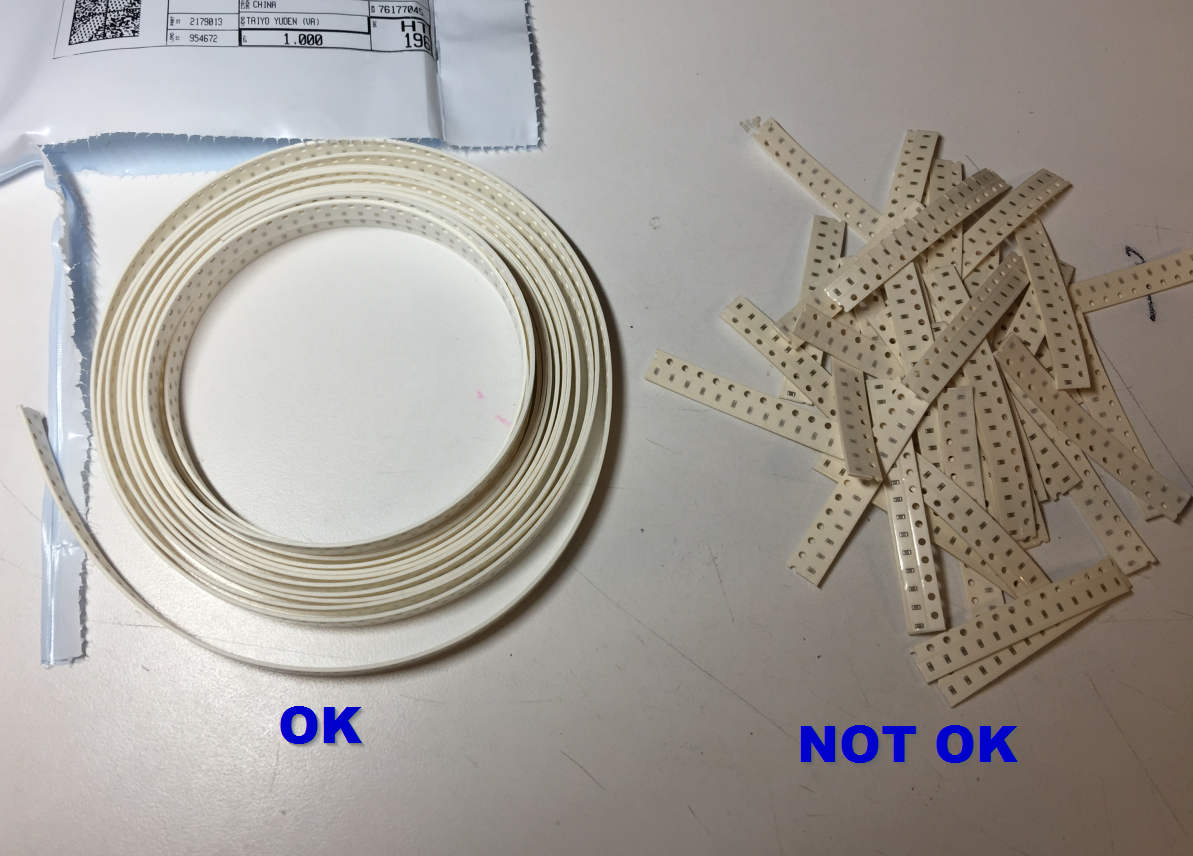
Tape leader is no longer required. You may supply your parts on cut tape, tube, or loose if they are very large ( > 16mm ~.5inch). For parts supplied on cut tape, each BOM line item / MPN / part type must be supplied on a single piece of tape. If you are shipping parts to us directly from your supplier please inform them of this when you order.
How to supply parts on cut tape
Supply Extra Boards and Parts
Depending on quantity, we may assemble your boards by hand or by machine. If we assembly by machine we need you to supply some extra parts since misfeeds sometimes occur or parts are lost during mount/dismount from the feeder. We always try to return all unused parts, but in the case of smaller parts supplied on tape, we cannot guarantee it.
Extra Parts Guidelines for machine assembly
PC BOARDS/PANELS: Send at least 1 extra.
LARGE COMPONENTS: Greater than ~16mm (~.5inch) : Send at least 5% extra or a max of 20
SMALL COMPONENTS: Less than ~16mm (~.5inch) : Send at least 10% extra or a max of 100
EXTRA-SMALL COMPONENTS: (0402s, 0201s): Send at least 20% extra or a max of 250
Extra Parts Guidelines for hand assembly
PC BOARDS/PANELS: Send at least 1 extra.
LARGE COMPONENTS: Greater than ~16mm (~.5inch) : Send at least 1 extra
SMALL COMPONENTS: Less than ~16mm (~.5inch) : Send at least 5 extra
EXTRA-SMALL COMPONENTS: (0402s, 0201s): Send at least 10 extra
Over-production Policy
We will assemble up to 2500 placements worth of extra boards if you supply us with sufficient parts. Divide 2500 by the number of placements per board and that’s how many extra boards we will assemble for you at no extra charge.
What about PC Board Panelization ?
PC Boards are typically fabricated in arrays called Panels. The process of creating an array of boards is called panelization. Assembling components onto panelized arrays of boards significantly reduces the amount of labor and therefore the cost. Let’s say for example, you have need 100 boards each with 10 placements and 5 BOM Line items. If you enter that into the price quoter you would get $8.30 per board. Now let’s say you supply these as 10 panels each with 10 boards (the total board quantity is still 100). The price would drop to $3.80 board
Should I Panelize or should my PC Fabricator ?
Some designers prefer to panelize themselves, however, PC Board fabricators do this all the time for their customers. In any case, you must adhere to our max size of 216 x 290mm (8.5 x 11.5 in). You should also ask them to send you the panelized paste mask layer which will be used to fabricate the stencil which you can just email to us.
How do I submit a panelized job ?
Exactly the same as you would a non-panelized job. Just submit 1-up (single article) copies of your BOM and gerber.
Can I mix jobs on a panel ?
Sorry, no. the boards on the panel must all be identical. If they are different you need to submit the entire panel as one job.
Can some boards on the panel have different orientations ?
Yes. For instance, a row or column along the edge can be rotated 90 degrees to maximize boards-per-panel.
Fiducials
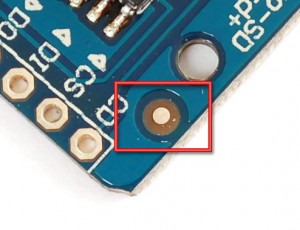
Fiducials are used by the pick and place machine’s vision system to align the board. Here are ‘must-have’ requirements for fiducials. Fidicuals may be positioned underneath parts.
- There should be 2 at opposing corners of the board
- They should be metal pads, unmasked, at least .5 mm in dia with a 2x unmasked guard area surrounding them
- They should be named FID1, FID2, .. FIDn in your BOM
Here are some ‘desirable’ characteristics of fiducials
- Ideally, there should be 3, one in each corner, Two should share common Y values and Two should share common X values.
- They should be at least 10mm apart
- If your boards are panelized, the fiducials can be on the panel frame (but it is safer to put them on both so we can assemble your boards depanelized)
For more information on fiducials see http://www.ladyada.net/library/pcb/fiducials.html
Example of a good fiducial (from http://www.ladyada.net/wiki/mdcpickandplace/fiducials)
Paste Mask File Format
The paste mask file is a standard paste layer in GERBER RS274X format. It will show all SMT pads that will need paste, plus the board outline. If you use Eagle, we have a .cam file for that. If you are submitting panelized boards, just submit the Placement BOM and Paste Gerber for one board.
Common Paste Mask Errors
The XY coordinates in the BOM and the paste mask gerbers must have the same origin, and they must be positive. An incorrect match may cause your upload to look like this:
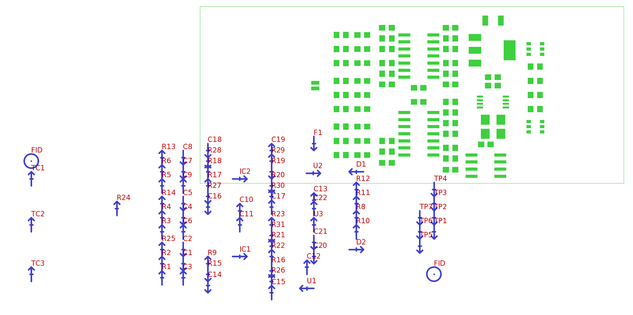 |
If you are using Eagle, this can be corrected by un-checking the Pos. Coord checkbox in the CAM Processor dialog.
Placement BOM Format
The placement BOM is a standard plain-ascii, comma-separated file. Quotations can be present, but are not required. It consists of:
- Zero or more free text lines, followed by
- Exactly one header line consisting of comma-separated column names
- One or more Data lines, each of which consist of comma-separated values
If you are using CADsoft Eagle, you can use our .ulp script to generate this file. The header line must include these column names: REF VALUE PACKAGE X Y ROTATION Other column names may be present, and will be preserved. Columns may be in any order. The column header line should then be followed by data lines. The columns in the data lines must match up with the column header. Here is an example of an acceptably-formatted file:
##########################################################################
       Name: Placement Bill of Materials Generator

    Version: 1
         By: Small Batch Assembly
        URL: www.smallbatchassembly.com
 SourceFile: rotation_test.brd
   DateTime: 6/6/2013 9:49:29 PM
      Units: inches
##########################################################################
REF , PACKAGE     , VALUE             , X     , Y     , ROTATION,
FID1, FIDUCIAL_G15,                   , 0.0750, 0.0750, 0.0
FID2, FIDUCIAL_G15,                   , 0.0750, 0.7500, 0.0
FID3, FIDUCIAL_G15,                   , 1.6500, 0.7500, 0.0
Q1  , SOT23-3     , MOSFET-NCHANNELSMD, 0.1580, 0.4670, 0.0
Q2  , SOT23-3     , MOSFET-NCHANNELSMD, 0.3580, 0.4670, 45.0
Q3  , SOT23-3     , MOSFET-NCHANNELSMD, 0.5580, 0.4670, 90.0
Q4  , SOT23-3     , MOSFET-NCHANNELSMD, 0.7580, 0.4670, 135.0
Q5  , SOT23-3     , MOSFET-NCHANNELSMD, 0.9580, 0.4670, 180.0
Q6  , SOT23-3     , MOSFET-NCHANNELSMD, 1.1580, 0.4670, 225.0
Q7  , SOT23-3     , MOSFET-NCHANNELSMD, 1.3580, 0.4670, 270.0
Q8  , SOT23-3     , MOSFET-NCHANNELSMD, 1.5580, 0.4670, 315.0
KiCAD Footprint Position File Export
If you are using KiCAD, here is the procedure: KiCAD refers to the placement BOM as a .pos file. In the KiCAD Pcbnew tool, before generating this file, you need to make sure all coordinates are positive by using the Place -> Drill and Place Offset at the bottom left corner of the board area. Place it just below and to the left of the bottom left corner of your board.
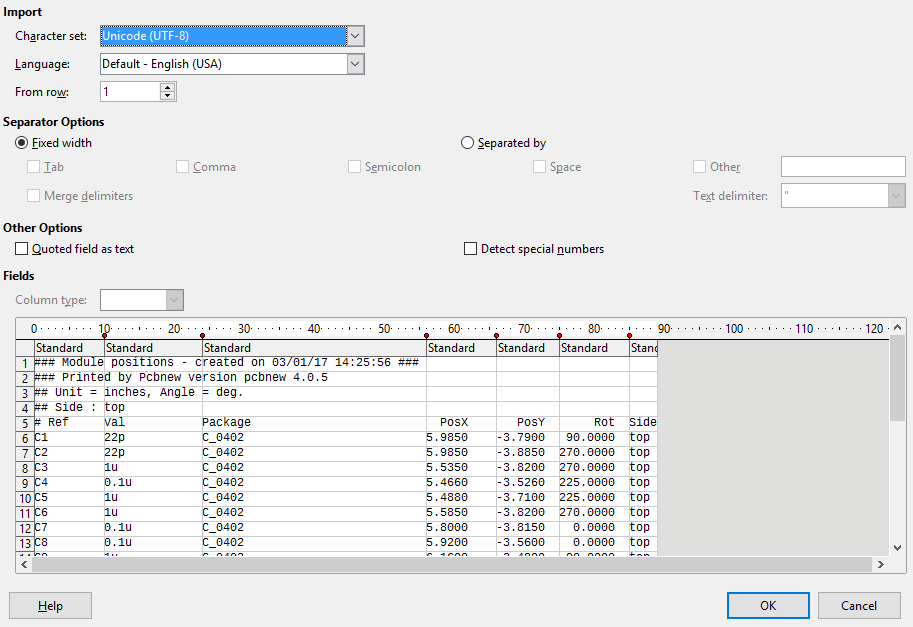
To generate the .pos file, use File -> Fabrication Outputs -> Footprint Position (.pos) File. Check [x] Inches, Filter [x] All. The .pos file will still need some massaging. Import it into a spreadsheet editor like Excel or the free Libre Office Calc tool, and mark off the column locations as you open the file as follows:
 |
Next, you will need to do a little editing.
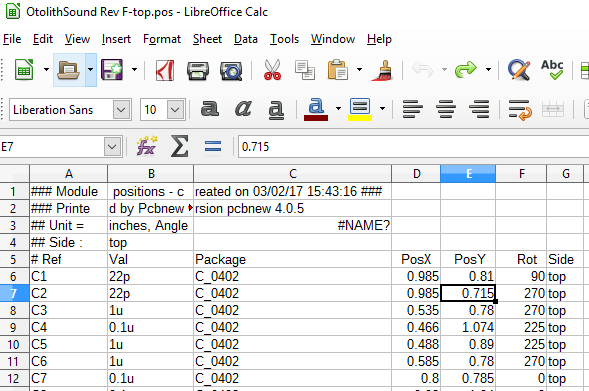 |
.POS file Loaded in Libre Office Calc. Ready for Editing
- Delete The first 4 lines.
- Delete the ‘Side’ Column
- Edit the Column Names line per below:
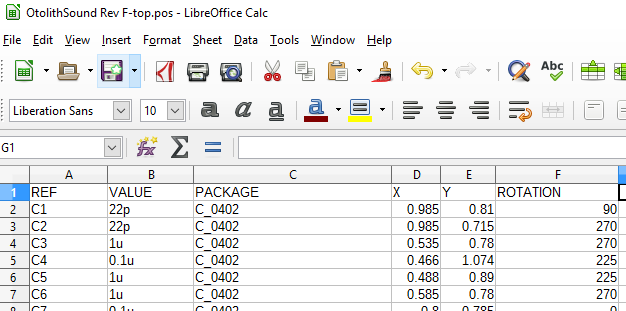 |
.POS file After Editing, Ready for Upload
You can do a Save->As , select .csv and select [x] edit filter settings, [x] Quote all text cells
The resulting file should now be importable on the Placement BOM page
KiCAD Gerber File Export
To upload the Paste Mask Layer from KiCAD, use the File -> Plot command. Be sure to check the [x] F.Paste and [x] Use auxiliary axis boxes. The top paste layer will be the file ending in .gtp
Tips for editing CSV Files
At some point you may need to edit your BOM file csv file directly. If you can’t use Microsoft Excel, a free option is Libre Office Calc. An on-line option is Google Sheets.
Offline editing of your BOM file
If you prefer to edit your BOM offline, you may do so; On the Job Info page, under Tools, use Download ZIP, to get a copy of your BOM. Edit it, and upload it again using the BOM Upload button. You will need to adhere to our column names and format conventions for extended column names:
Required Columns
- The header line must include these column names: REF PACKAGE VALUE X Y ROTATION
- Columns may be in any order
|
COLUMN NAME |
DESCRIPTION |
| REF | These are the Reference Designator from your Schematic. (Q1, Q2, R1, C1, etc) They can be any alphanumeric value and must be unique. Note: Reference Designators beginning with FID are treated as fiducials |
| PACKAGE | This is the Package field from your Schematic. Typically this will be the SMT size (0603, 0805, etc.), however any alpha-numeric pattern which connotes the package type is acceptable. NOTE: that any Placement BOM line items which have identical Package and Value fields will be considered a single BOM line item type (ie if R1 and R2 are both have a Package of 0603 and a value of 1k, then they will be considered one BOM line item) |
| VALUE | This is the Value field from your Schematic. Examples: ’1k’, ‘.1uf’, etc. Any alpha-numeric pattern which connotes the package value is acceptable. NOTE: Any BOM line items which have identical Package and Value fields will be considered a single BOM line item type (ie if R1 and R2 are both have a Package of 0603 and a value of 1k, then they will be considered one BOM line item) |
| DESCRIPTION | Description of part. Free format alphanumeric. Recommend adhering to format which includes at minimum, component type, value, and package such as ‘RES 1k 0603′ or ‘CAP .1UF 0805’ |
| X | This is the X coordinate of the center of the part in inches. Values must be positive. |
| Y | This is the Y coordinate of the center of the part in inches. Values must be positive. |
| ROTATION | This is the rotation of the part in degrees counter-clockwise in the range 0 to 359 |
Additional Columns
If you upload a BOM with just the Required Columns above, our system will ask you to fill in additional information before you can submit the job.
While these columns are not required at upload time, supplying them eliminates the need to edit the BOM and enter the information after it is in our system.
When you download a zip of your job, your BOM will have this information filled in.
| COLUMN NAME | DESCRIPTION |
| SUPPLIER | Who supplies the part: a: small batch supplies part, c: customer supplies part |
| SBAPN | Small Batch Part Number. This is the number from our Parts List Leave blank if customer is supplying the part |
| MFRPN | Manufacturers part number; Free text. This should be NOT be a distributor part number. It should be searchable on octopart |
| KITTING | Must be one of: tape-with-leader, tape-no-leader, other |
| KITTING_D | Kitting Description – Free text which describes kitting. Only required if KITTING == other |
Optional Columns
These columns may be included but are not required.
| COLUMN NAME | REQUIRED ? |
DESCRIPTION |
| MFR | no | Name of the manufacturer. Free format alphanumeric |
| REMARKS | no | Reserved |
| LINK | yes (if customer supplies part) |
URL to Datasheet containing package info |
| LINK_PAGE | yes (if customer supplies part) |
URL to page on datasheet containing package info |
Rotation
We’ve found that specifying rotation in the placement BOM file is too hard to get right. Instead, we go strictly by your silkscreen markings for polarized parts. If there is a question, we contact you before production.
I have an entry in the BOM I don’t want populated
Edit that part entry under BOM Edit, and assign it the Small Batch NoPart identity (0.0). Or you can simply not include it in the BOM upload
Submitting a Job For a Quote
Once you have uploaded your BOM and Gerber, and categorized all the parts as to who will supply them, the system will allow you to submit the job for quote. We will normally get back to you within one business day with a price.
Quote Received. Now What ?
You may now pay for the job through PayPal or credit card. Follow the instructions in the email you received with the quote.
OK, I paid. Now What ?
Give us one busniess day to produce kit info for you. You will receive an email that looks like this:
What’s the next step ?
[ ] REVIEW YOUR JOB
Attached you will find a ZIP containing files related to your job.
The file report.pdf is a printable version of your Job Detail, also available online at XXX Check the placements image and double-check that polarized parts aligned correctly.[ ] PRINT OUT AND ATTACH KIT LABELS
The file labels.pdf contains a printable labels. Separate the labels and attach them to their respective parts.
- Double-check that your component type and counts are correct.
- Double-check that you are sending sufficient quantities. While some sanity checking is done when we check-in your kit, you are ultimately responsible for the accuracy of this step.
[ ] SEND EXTRA BOARDS AND COMPONENTS
While our goal is to keep the defect rate as close to zero as possible, scrap happens, so you will need to send us extra parts;
- PC BOARDS/PANELS – Send at least 1 extra.
- LARGE COMPONENTS – Greater than ~16mm (~.5inch) : Send at least 5% extra or a minimum of 5
- SMALL COMPONENTS – Less than ~16mm (~.5inch) : Send at least 20% extra or a minimum of 20
Keep in mind we return all unused items which you can use for future production.
SHIPPING INFO
Send your well-packed, insured kit to this address.Small Batch Assembly
45449 Severn Way STE 165
Sterling VA 20166
USAPlease send us tracking info when you have it. We will contact you as soon as we receive it.
Questions ?Don’t hesitate to email us
Yours Truly,
support@smallbatchassembly.com
How do I make a change to a submitted job ?
Email support@smallbatchassembly.com letting us know you the jobid, and we will change its status so you can edit it.
Yield, Rework, and Refunds
TLDR; While we do everything to ensure we assemble boards correctly. If you find errors. Contact us immediately. If you have to rework or scrap a board due to assembly error, we will credit or refund you the assembly charge for that board. Period.
Manufacturing is a Team Effort. Ideally, yield is 100%. For simple boards that have been designed for manufacturability, this is often the case. But more often than not, yield is not 100%. The cause may our bad – Assembly errors; polarity (we always check w/you if we are uncertain), too much solder paste, not enough solder paste, bridging, tombstoning.. The cause may be bad components or PCBs. The cause may be your bad: Incorrect CAD info, mislabeled parts, malfunctions which only exhibit themselves in larger volumes. Etc, etc, etc. Our philosophy is simple; It doesn’t matter whose fault it is. If you have to rework or scrap a board and you think it was our fault, just tell us, and we will refund you the assembly fee for that board. For sanity’s sake, however, we do ask that you contact us within 30 days of delivery of your boards.
Our Official Terms and Conditions
CANCELLATION: If you cancel your order before we purchase materials for your job, we will refund you fully. If you cancel after we have purchased materials uniquely for your job we cannot return, we will refund you the the full amount of our fees minus our costs for those materials. If you cancel after production starts we will refund you the only our production fees for the articles not produced.
REWORK/DEFECTS: If you have to rework or scrap a board for any reason you believe due to fabrication errors, we will credit or refund you our fee for the fabrication of that board.
LIMITATIONS: All claims must be made within 30 days of delivery of goods. Claims shall be limited to our total fee for the job, less materials and shipping costs.
Privacy Policies
The short form: We only record your email and password which is encrypted using best practices. Your email will only be used to communicate with you about your business with us. We collect payment via PayPal and Stripe and your financial information is never stored on our server. We will never sell share your email address or other information with a third party.
Where did the name “Small Batch Assembly” Come From ?
About mid-way along into developing the idea for the business, I started looking for domain names. I found some awful ones that can go without mentioning. I had read Chris Anderson’s Makers: The New Industrial Revolution. A lot of ideas from that book were cycling through my subconscious. Somewhere along the line, probably in the shower, I came upon “Small Batch” as a good prefix. It was only much later when I was re-reading sections of the book that I found this passage in Chris’s book which refrenced a blog by Jason Kottke. So at the end of the day, Chris should be credited for articulating a good deal of the ideas, and Jason for coming up with the popular use of the term.
Our Facilities
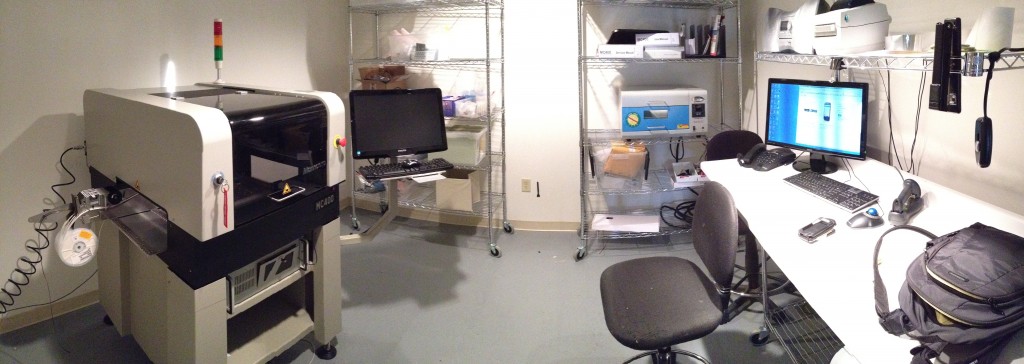
- Manncorp MC-400 / Autotronik BS-281 Pick and Place
- GLICHN SR352C Reflow Oven
About the Web Site
The web site was written by Bob Coggeshall and consists of approximately 18 thousand lines of php. It is implemented as a series of wordpress plugins. There was also an obligatory amount of Javascript and jQuery. The css framework used is bootstrap. Certain functionality including the price quotation, pdf generation, and back-end barcode scanning tools are written in python.
